Roasted Pumpkin and Sweet Potato Soup

Pumpkin soup has got to be up there with some of the tastiest foods ever (and something Brooke would eat every day if she could). When winter rolls around, the cravings for soup inadvertently comes with it (not that winter is overly cold in Perth). With the barometer dropping to a freezing (16 degrees Celsius) in Perth, we braved the chilling conditions to visit a local farmers market to collect the necessary ingredients for Brooke’s roasted pumpkin and sweet potato soup recipe.

This delicious recipe is so simple, plus it has some easy steps that save you some time and add loads of flavour.

This flavour-packed soup is adapted from a Donna Hay recipe and it is roasting the pumpkin and sweet potato first that I think makes this recipe so good.

A tip when you are roasting your vegetables. You will know the pumpkin and sweet potato is done when the pumpkin has caramelised and is soft enough to scoop away from the skin. If you think your sweet potato has cooked faster then your pumpkin, don’t stress. Just remove from the pan and keep to the side while the pumpkin remains cooking.

If you wish to season the soup, following Brooke’s family recipe, she likes to season with Clive of India curry powder. Other alternatives are nutmeg or cumin, or simply leave just how it is! This roasted pumpkin and sweet potato soup recipe is a must for winter lunches or dinners.

If your looking another soup recipe to try then why not give our Creamy Cauliflower Soup Recipe a go or our Healthy Vegetarian Zucchini Soup Recipe

Pumpkin and Sweet Potatosautéed leeksRoasted Pumpkin and Sweet Potato Soup IngredientsRoasted Pumpkin and Sweet Potato SoupRoasted Pumpkin and Sweet Potato Soup

Roasted pumpkin and sweet potato soup – Recipe Instructions

5.0 from 2 reviews
Roasted Pumpkin and Sweet Potato Soup
 
Prep time
Cook time
Total time
 
This delicious recipe is so simple, plus it has some easy steps that save you some time and add loads of flavour.
Author:
Recipe type: Soup
Cuisine: Australian
Serves: 4
Ingredients
  • 1Kg butternut pumpkin (left in half)
  • 500g kabocha pumpkin (Japanese pumpkin)
  • 500g sweet potato
  • 1 onion
  • 1 leek
  • olive oil, for drizzling
  • sea salt
  • 3 ½ cups (875ml) chicken stock
  • 1 tablespoon honey
  • 1 tablespoon curry powder
  • cream to serve
Instructions
  1. Preheat oven to 220°C (425°F).
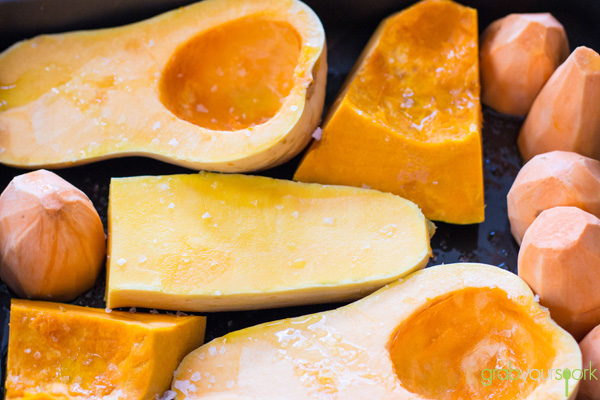
  2. If the pumpkin is whole, cut the pumpkin in half (lengthways) and scoop out the seeds.
  3. Peel the sweet potato, and cut into large chunks
  4. Place the pumpkin and sweet potato and a halved onion in a roasting pan. Be sure to cook the pumpkin skin side down.
  5. Drizzle with a little oil and sprinkle with salt.
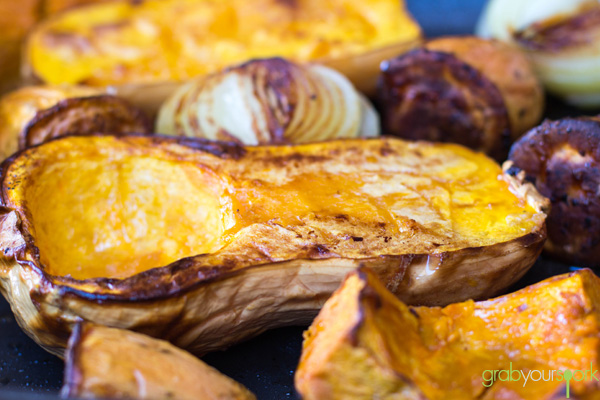
  6. Bake for 55–60 minutes or until the pumpkin and sweet potato is just soft and starting to brown.
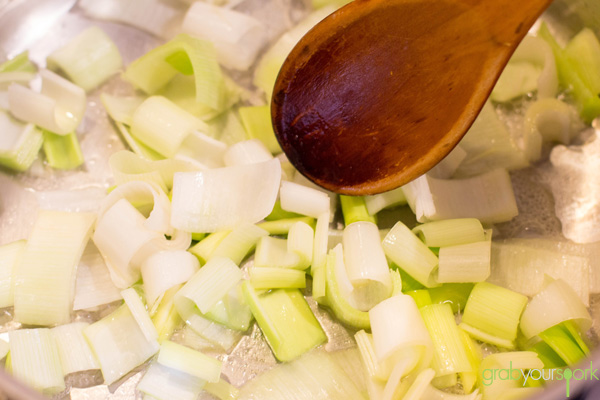
  7. While the roasted vegetables cool down, you can slice the leek into 1 centimetre rings, and wash thoroughly.
  8. Before you cook the leeks, you can begin to scoop the roasted pumpkin away from the skin. Add to the leeks once they are sautéed.
  9. After heating a large pot you can sauté the leek with a drizzle of olive oil.
  10. Once the leeks are soft, you can add the roasted pumpkin and sweet potato to the pot.
  11. Add 1 cup of the chicken stock at a time and blend until smooth.
  12. Once the vegetables have broken down and cooled slightly, you can blend the soup in a blender or just use a stick blender.
  13. Pour the mixture back into a saucepan, add remaining stock if required
  14. Season the soup with curry powder and add honey.
  15. Place over medium heat until soup is heated through.
  16. Serve with a dash of cream.
Notes
I would recommend blending the soup in the pot using a stick blender (bar mix) to avoid more washing up.


Easy Lemon Curd Recipe

The other week, Brooke and I had an amazing dinner at Clarke’s of North Beach. To finish off the night we were served an incredible deconstructed Lemon Meringue Pie and Lemon Pudding. The pie embodied everything there is to love about lemon desserts. The lemon filling was tangy, and the sweet meringue balanced the sharpness of the lemon beautifully. This delightful lemon dessert set the wheels of inspiration in motion for us to attempt making our own easy lemon curd recipe at home.

With an abundance of lemons we had at the house which had been given to us from some friends it was decided we must make lemon curd!

When making lemon curd (or any lemon dessert) always try and use home grown lemons. Yes, the ones in the shops look amazing, but they have nowhere near enough flavour! That’s the best piece of advice we have for anyone attempting to make their own lemon curd.

When thickening the curd, you want it to be thick enough to coat the back of the spoon or whisk. This super easy lemon curd recipe is something anyone can master at home.

If you are looking for something to go with your lemon curd on then try our cranberry and apricot hot cross buns.

Easy Lemon Curd Recipe Ingredients
Easy Lemon Curd Recipe Whisk
Easy Lemon Curd Recipe
Quick and Easy Lemon Curd Recipe

Easy Lemon Curd – Recipe Instructions

5.0 from 2 reviews
Easy Lemon Curd Recipe
 
Prep time
Cook time
Total time
 
When making Lemon curd (or any lemon dessert) always try and use home grown lemons. Yes, the ones in the shops look amazing, but they have nowhere near enough flavour!
Author:
Recipe type: Spread
Cuisine: British
Serves: 4
Ingredients
  • 2 eggs, plus 2 egg yolks
  • ¾ cup (165g) caster sugar
  • ⅓ cup (80g) chilled unsalted butter
  • Zest and juice of 2 lemons
Instructions
  1. Whisk whole eggs, yolks and sugar in a saucepan until smooth, then place pan over a low heat.
  2. Add the butter, juice and zest and whisk continuously until thickened.
  3. Strain through a sieve into a bowl or jar. The curd will continue to thicken as it cools. Lemon curd will keep for two weeks in the fridge when covered.
Notes
If you get little white bits in your butter, it is just the egg whites. Your lemon butter will still be fine, once you have strained it.


Cranberry and Pistachio Biscotti Recipe

Where to start my ramblings on how much I love this cranberry and pistachio biscotti recipe? The first time I tried this biscotti was at Christmas time last year when Brooke made it and put it in little gift bags to give to the family. Thankfully, Brooke made two batches because I found myself eating piece after piece without realising just how many I had eaten.

There are many variations available, but I’m reliably informed that this is a Donna Hay recipe. One of the things I like most about this cranberry and pistachio biscotti recipe is that it’s crisp, but not tooth-breaking like some other biscotti recipes.

If you’ve never made biscotti before because you thought it is too complicated? Then you’re all wrong! It’s actually fairly straight-forward. The word biscotti (or biscotto) translates to “twice baked”, which is basically all you are doing. After baking the dough once in a log shape, then slicing the logs, you bake the biscotti again on a higher heat to dry them out giving them a nice crisp texture.

The only tricky part is getting the timing of the second bake right so the biscotti are crisp enough. You don’t want chewy biscotti, but you don’t want to break a tooth either. Mind you the process is much easier when you are just observing it and taking photos like I was.

Cranberry and pistachio biscotti make for a quick breakfast bite with your morning coffee, or if you’re like me a snack after lunch, or even a nibble before bed. I swear I have will power (no, I really don’t. None at all). But don’t let this deter you from making them. Just be sure to give at least half away to friends (or at the very least hide away from judging eyes while you scoff the lot).

If your like our cranberry and pistachio biscotti recipe then try our melting moments with jam or ginger nut biscuits.

Cranberry and Pistachio Biscotti Recipe IngredientsCranberry and Pistachio Biscotti DoughCranberry and Pistachio Biscotti Before BakingCranberry and Pistachio Biscotti First BakeCranberry and Pistachio Biscotti Second BakeCranberry and Pistachio Biscotti

Cranberry and Pistachio Biscotti – Cooking Instructions

5.0 from 2 reviews
Cranberry and Pistachio Biscotti Recipe
 
Prep time
Cook time
Total time
 
The word biscotti (or biscotto) translates to “twice baked”, which is basically all you are doing. After baking the dough once in a log shape, then slicing the logs, you bake the biscotti again on a higher heat to dry them out giving them a nice crisp texture.
Author:
Recipe type: Baked Goods
Cuisine: Italian
Serves: 80
Ingredients
  • 2 cups plain flour, sifted
  • 1½ tsp baking powder sifted
  • ¾ cup caster sugar
  • 3 eggs, lightly beaten
  • 2 tsp vanilla extract
  • 1 tbsp finely grated orange rind
  • 1 cup sweetened, dried cranberries
  • 1 cup shelled unsalted pistachios
Instructions
  1. Preheat oven to 160°C.
  2. Place flour, baking powder and sugar into a bowl and mix to combine.
  3. Add eggs, vanilla, orange rind, cranberries and pistachios and mix until you form a dough.
  4. Turn the dough out onto a table and with some flour, knead until smooth.
  5. Form into two logs and flatten slightly. Bake in oven on lined baking trays for 30-35 minutes or until firm. Allow to cool completely.
  6. Once cooled use a serrated knife to cut thin slices and place them back on baking trays.
  7. Reheat oven and increase temperature to 180°C.
  8. Bake biscotti for a further 8-10 minutes or until crisp. Cool on the tray for a few minutes before sampling.

Simple Guacamole Recipe

So here it is… the first ever post on Grab Your Spork. It was a tough decision what our first recipe should be, but we decided that it might be best to start with something easy. Brooke and I like many variations of guacamole, but this simple guacamole recipe is one of our favourites.

Avocados are grown in the South-West part of Western Australia where we live . It’s great when they are in season as we can get some awesome quality avocados at our local farmers markets here in Perth.

This simple guacamole recipe was made with perfectly ripe avocados mixed with fresh chilli, coriander, onion and lime. Guacamole should be made just before serving (where possible) to maintain it’s vibrant colour.

The key to the perfect guacamole recipe is ripe avocados. Check for ripeness by gently pressing the outside of the avocado. If there is no give, the avocado is not ripe yet and will not taste good. If there is a little give, the avocado is ripe. If there is a lot of give, the avocado may be overripe and not good. In this case, taste test first before using.

If your looking for something to pair with this simple guacamole recipe, then try our tomato salsa recipe.

Simple Guacamole Recipe IngredientsSimple Guacamole Recipe IngredientsSimple Guacamole RecipeSimple Guacamole Recipe with Corn Chips

Simple Guacamole Recipe – Instructions

5.0 from 3 reviews
Simple Guacamole Recipe
 
Prep time
Total time
 
This simple guacamole was made with perfectly ripe avocados mixed with fresh chilli, coriander, onion, tomato and lime. Guacamole should be made just before serving where possible so as maintain it's vibrance.
Author:
Recipe type: Snack
Cuisine: Mexican
Serves: 4
Ingredients
  • 3 large ripe avocados, peeled and pitted
  • 1 lime, juiced
  • ½ jalapeño, seeded and diced
  • ½ large red onion, diced
  • 1 clove garlic, minced
  • 3 tbs. coriander (cilantro) leaves
  • 1 tsp. salt
  • Tabasco to taste (Add as much heat as you like)
Instructions
  1. Scoop avocado into a bowl.
  2. Mash with a fork until you have a smooth, chunky texture.
  3. Add lime juice, jalapeño, onion, garlic, coriander (cilantro) leaves, salt and mix gently.
  4. Eat until your heart is content.